
Step 01
Change one category at a time.
Open File → Preferences…. Incline presents four categories: Interface, Camera, Performance, and Developer. This guide stays with the first three because they affect everyday design work. Preference edits are held as a draft until you choose Save Changes; Cancel returns the controls to the currently saved values.
Leave Developer controls at their defaults unless you are diagnosing Incline itself. Triangle chunk colouring and clipping-plane readouts are debugging aids, not general ways to improve surface quality or application speed.
Open a representative project before tuning. A pit topology, several design layers, and a block model provide a more useful test than an empty workspace. Record any team-standard values before changing them.
Step 02
Keep the workspace legible.
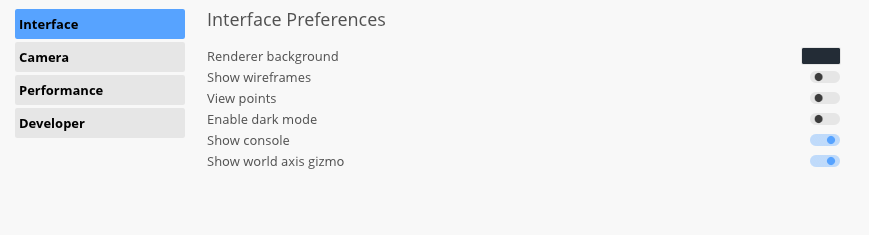
Renderer background changes the colour behind the 3D scene. The default is the dark blue-grey #232c36. Choose contrast that keeps both light and dark design colours readable. Show wireframes exposes all topology triangle edges; View points shows vertices on visible design objects. Both default off because dense projects can become visually noisy.
Enable dark mode changes the application interface and icon set, not the engineering data. Show console defaults on and is useful for import, generation, and warning messages. Show world axis gizmo also defaults on and preserves a compact orientation reference in the viewport.
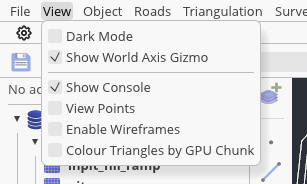
The View menu provides quick versions of Dark Mode, Show World Axis Gizmo, Show Console, View Points, and Enable Wireframes. Use those toggles during inspection; return to Preferences when you also need background or camera settings.
Step 03
Make Plan mode predictable.
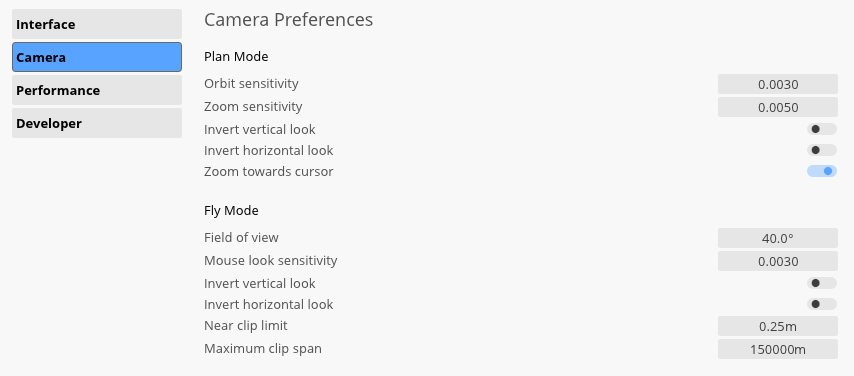
Plan mode starts with Orbit sensitivity at 0.003 and Zoom sensitivity at 0.005. Increase a sensitivity in small steps when large mouse movements feel slow; reduce it when the camera overshoots narrow ramps or small polygons. Avoid changing both at once, because you will not know which adjustment fixed—or caused—the problem.
Vertical and horizontal inversion both default off. Enable either only to match an established navigation habit. Zoom towards cursor defaults on, keeping the feature under the pointer as the view closes in. Turning it off makes zoom stay centred instead, which can feel steadier when reviewing a fixed area.
Step 04
Set Fly mode for the scene scale.
Fly mode defaults to a 40° Field of view and 0.003 mouse-look sensitivity, with both look inversions off. A wider field shows more context but exaggerates perspective toward the edges; a narrower field feels more zoomed and can make orientation harder. Change the field of view before sensitivity so the apparent movement is judged consistently.
Near clip limit defaults to 0.25 m. Reducing it allows geometry very close to the camera to remain visible, but asks the depth range to cover more extremes. Maximum clip span defaults to 150,000 m and limits how much scene depth Fly mode includes. Raise it only when distant geometry is genuinely being clipped; an unnecessarily large span can reduce depth precision.
Step 05
Trade work for responsiveness deliberately.
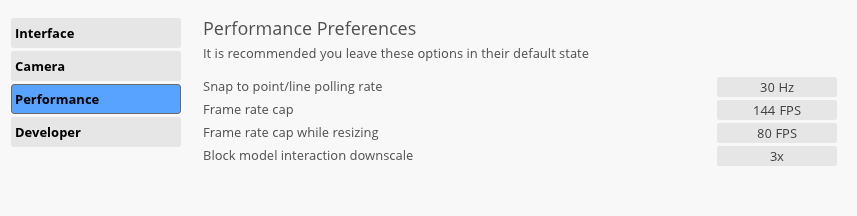
The default Snap to point/line polling rate is 30 Hz. A higher rate refreshes snap queries more often, which may feel more immediate but adds CPU work in dense scenes. The normal Frame rate cap is 144 FPS; lowering it can reduce power and GPU use when the display or remote session gains nothing from extra frames.
Frame rate cap while resizing defaults to 80 FPS, limiting redraw work while the window dimensions are changing. Block model interaction downscale defaults to 3x. During camera movement, a larger divisor renders the block model at lower resolution for faster interaction; 1x keeps full interaction resolution and demands more graphics work. Full quality returns after the camera settles.
Change the smallest control that matches the symptom: polling rate for lagging point or line snaps, the frame cap for sustained redraw cost, and block-model downscale for stutter specifically while moving the camera. Surface wireframes and design strings are not controlled by the block-model downscale setting.
Step 06
Save, test, and keep a recovery path.
Choose Save Changes, return to the workspace, and repeat one short test: orbit around a known crest, zoom to a vertex, snap along a dense line, then fly through the loaded scene. Change only the setting tied to a visible problem. If the result becomes difficult to control, Restore Defaults replaces the draft with Incline’s defaults; choose Save Changes to apply them.
The interface retains useful context without unnecessary clutter, both camera modes feel controlled, and performance settings have been changed only in response to a measured issue.